|
|
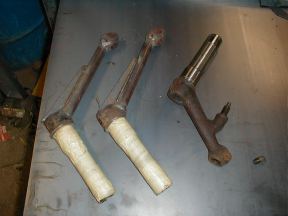
After building my longer rear arms I found that the ride in the rear was unbelievable. I no longer felt like I was bouncing over every bump in the road or needing a kidney replacement at the end of the day. The problem was that I noticed the poor handling in the front even more. I decided that for what I use my bug for I needed something stronger and stiffer than the stock bug front beam and with more travel. I decided to go with a kingpin bus front beam and make some longer/wider trailing arms. I figured with the longer travel, the heavier spring rate of the bus would be about right. Any adjustment I needed after that would have to come from coil over shocks or maybe some adjusters. The first step was to make a jig that would hold all the pieces together for welding. I had some real estate left on the plate I built my rear arm jig on so I just slipped it in there. I chose some tubing that just went around the bearing races on the arm and cut a slot in them. I welded a couple rings on either side of the slot and put a bolt through the rings that I could tighten and make a clamp out of the tubing. This would hold the base of the arm in place. The other end was held in place by a piece of rod that I turned down to fit inside the end of the arm and welded it to a piece of angle the right distance away from the base. I cut the center out of the arm leaving only the torsion spring insert and the ring on the outside. I had bought some one inch 4130 Chromolly at the start of this project so I carefully measured the length and angles of the arm shaft and started cutting. I tacked the newly cut piece onto the mounted ends with my welder then buzzed them up a bit. At this point I removed it from the jig, wrapped the bearing surfaces with tape for protection, and finished welding. What was recommended to me was that I used my standard hard wire with a 75argon/25CO2 mix for welding and do not triple pass the weld. That way it would not dilute the hardened chromoly. I then used some 11 gauge steel and made some overlapping braces for each of the joints and a triangle out of 1/4" to reinforce the arm at the mount. After much welding and hammering I ended up with a pretty stout arm. If you dress it up with a grinder be careful not to nick or scratch the tubing. Every place you scratch, even with a scribe, is VERY prone to breakage. IMPORTANT!!: One thing to keep in mind is that the bottom arms with the shock mount are 1/4" wider than the top ones. I solved this problem by making a 1/4" wide spacer for the end jig mount to move the end of the arm out that 1/4". Of course I did not do that until I had made three of them and Craig brought to my attention that they were different. Hey, I was just building it. Lastly I built the shock mounts for the lower arms. I have yet to figure out if I am going to use bump stops built in to the beam or if I am just going to use upper stops with limiting straps. I am going to start with the straps and see how they work out. NOTE: This project is on hold.
|
For problems or questions regarding this web contact
.
|